[Python] django 게시판 글쓴이 표시 (2)
반응형
데이터베이스에 저장한 글쓴이 필드인 author 속성을 웹브라우저 표시하고자 합니다.
글쓴이를 표시할 페이지는 (1)질문 목록 페이지와 (2)질문 상세 페이지 입니다.
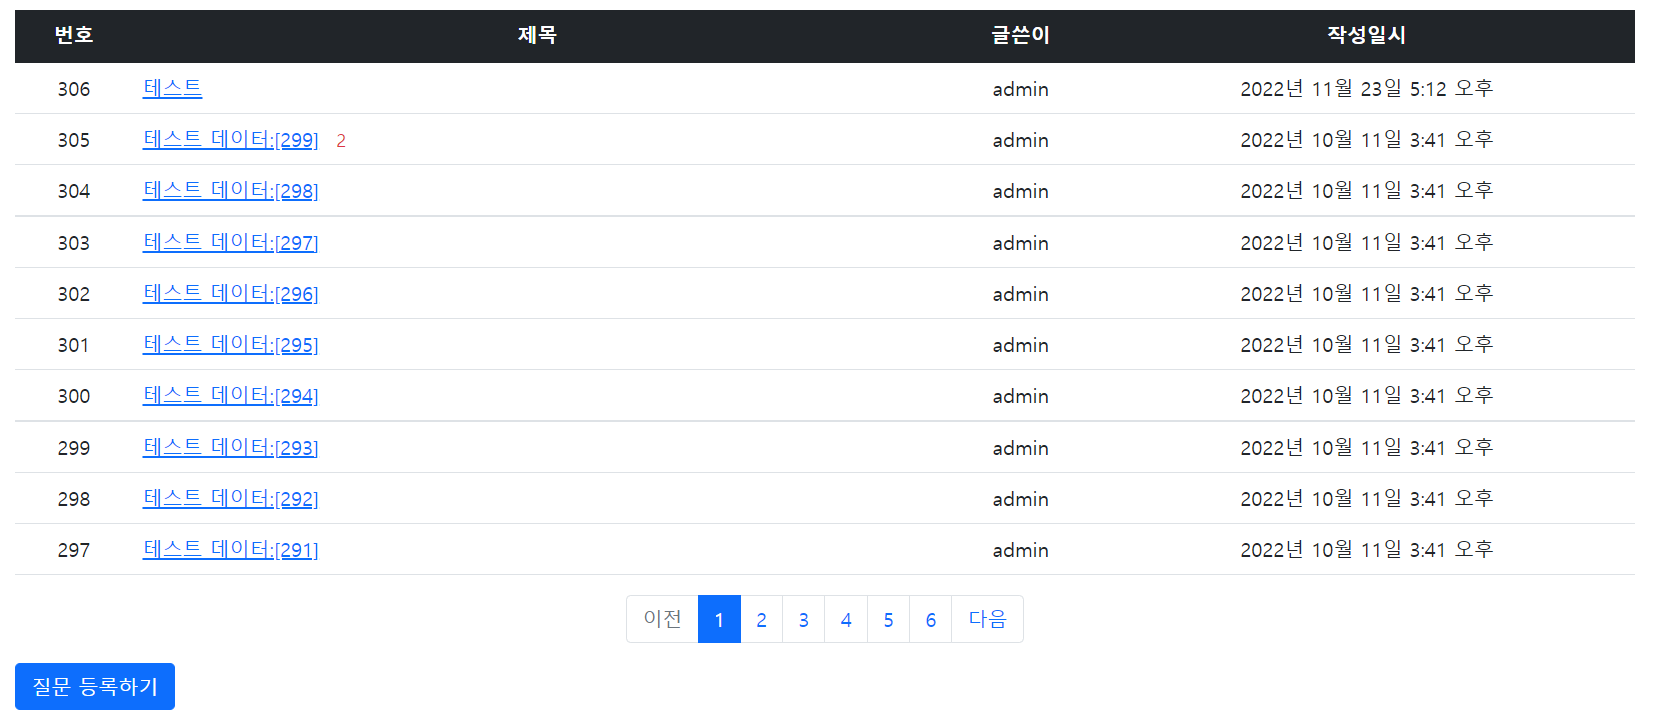
먼저 질문 목록 페이지에 표시합니다.
1. 질문 목록
mysite\templates\pybo\question_list.html 파일을 아래와 같이 수정합니다.
{% extends 'base.html' %}
{% load pybo_filter %}
{% block content %}
<div class="container my-3">
    <table class="table">
        <thead>
        <tr class="text-center table-dark">            <!-- 수정 -->
            <th>번호</th>
            <th style="width:50%">제목</th>            <!-- 수정 -->
            <th>글쓴이</th>                            <!-- 추가 -->
            <th>작성일시</th>
        </tr>
        </thead>
이어서 for 문에도 다음과 같이 수정합니다.
   {% for question in question_list %}
        <tr class="text-center">   <!-- 가운데 정렬 -->
            <!-- 게시글 번호 처리를 위한 구문 시작 -->
            <td>
                <!-- 게시글 번호= 전체건수 - 시작인덱스 - 현재인덱스 + 1 -->
                {{ question_list.paginator.count|sub:question_list.start_index|sub:forloop.counter0|add:1 }}
            </td>
            <!-- 게시글 번호 처리를 위한 구문 끝-->
            <td class="text-start">         <!-- 제목 왼쪽 정렬  -->
                <a href="{% url 'pybo:detail' question.id %}"> {{question.subject }}</a>
                <!-- 게시글 답변 개수 처리 시작 -->
                {% if question.answer_set.count > 0 %}
                <span class="text-danger small mx-2"> {{ question.answer_set.count }}</span>
                {% endif %}
                <!-- 게시글 답변 개수 처리 끝 -->
            </td>
            <td>{{ question.author.username }}</td>   <!-- 글쓴이 추가 -->
            <td>{{ question.create_date }}</td>
        </tr>
        {% endfor %}
        {% else %}
        <tr>
            <td colspan="4">질문이 없습니다.</td>    <!-- 3에서 4로 변경 -->
        </tr>
        {% endif %}
        </tbody>
    </table>
아래 구문을 삽입하여 질문의 글쓴이를 표시했습니다.
<td>{{ question.author.username }}</td> <!-- 글쓴이 추가 -->
그리고 테이블 내용을 가운데 정렬하도록 text-center 클래스를 추가하고, 제목을 왼쪽 정렬하도록 text-start 추가했습니다. 테이블 항목도 3개에서 4개로 늘었으므로 colspan도 3에서 4로 수정했습니다.
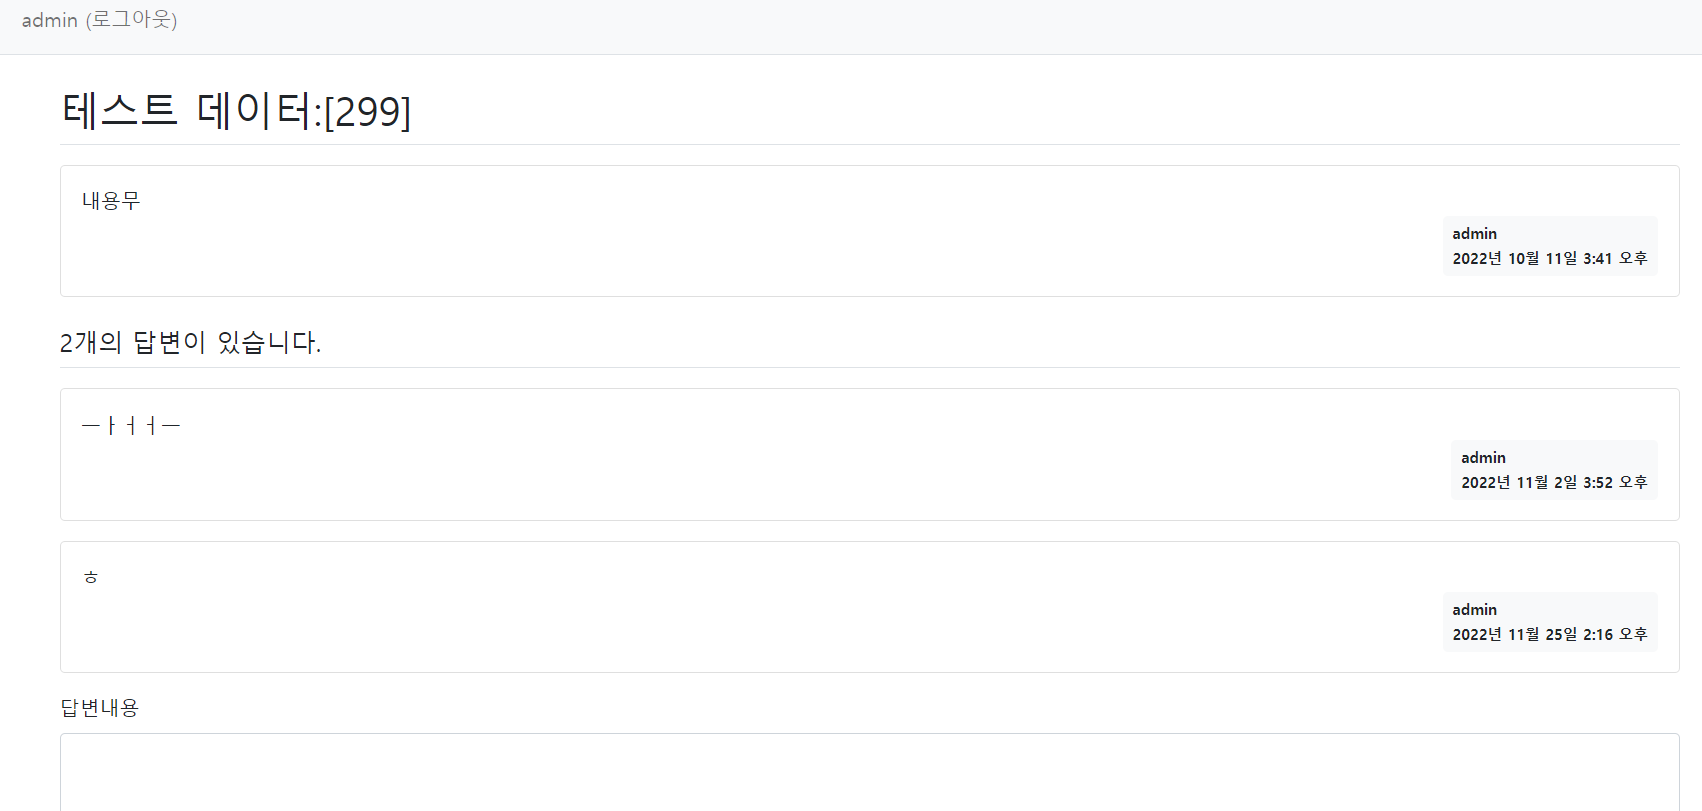
2. 질문 상세 페이지
질문 글에 글쓴이와 작성일시가 함께 보이도록 아래와 같이 수정합니다.
mysite\templates\pybo\question_detail.html
<!-- 질문 -->
<h2 class="border-bottom py-2">{{ question.subject }}</h2>
<div class="card my-3">
    <div class="card-body">
        <div class="card-text" style="white-space: pre-line;">{{ question.content }}</div>
        <div class="d-flex justify-content-end">
            <div class="badge bg-light text-dark p-2 text-start">     <!-- 변경 -->
                <div class="mb-2">{{ question.author.username }}</div>      <!-- 변경 -->
                <div>{{ question.create_date }}</div>      <!-- 변경 -->
            </div>
        </div>
답변 부분에도 글쓴이 추가합니다.
<!-- 답변 -->
<h5 class="border-bottom my-3 py-2">{{question.answer_set.count}}개의 답변이 있습니다.</h5>
{% for answer in question.answer_set.all %}
<div class="card my-3">
    <div class="card-body">
        <div class="card-text" style="white-space: pre-line;">{{ answer.content }}</div>
        <div class="d-flex justify-content-end">
            <div class="badge bg-light text-dark p-2 text-start">      <!-- 수정 -->
                <div class="mb-2">{{ answer.author.username }}</div>   <!-- 수정 -->
                <div>{{ answer.create_date }}</div>                    <!-- 수정 -->
            </div>
        </div>
확인
이 글은 위키독스의 점프투장고를 통해 공부한 내용을 기록한 것입니다.
반응형
'IT > Linux' 카테고리의 다른 글
| [Python] django 뷰 파일 분리 (0) | 2022.12.05 |
|---|---|
| [Python] django 게시판 작성된 글 수정 및 삭제 기능 구현 (0) | 2022.12.01 |
| [Python] django 게시판 글쓴이 항목 추가하기 (1) (2) | 2022.11.24 |
| [django] 장고 MTV 패턴 익히기 (0) | 2022.11.17 |
| [Python] django 장고 회원가입 페이지 만들기 (0) | 2022.11.02 |


댓글