[Python] django 부트스트랩(Bootstrap) 적용
부트스트랩(Bootstrap)은 디자이너의 도움 없이도 웹 페이지의 디자인을 손쉽게 만들 수 있게 도와주는 프레임워크입니다.
부트스트랩은 다음 URL에서 다운 받아 설치할 수 있습니다.
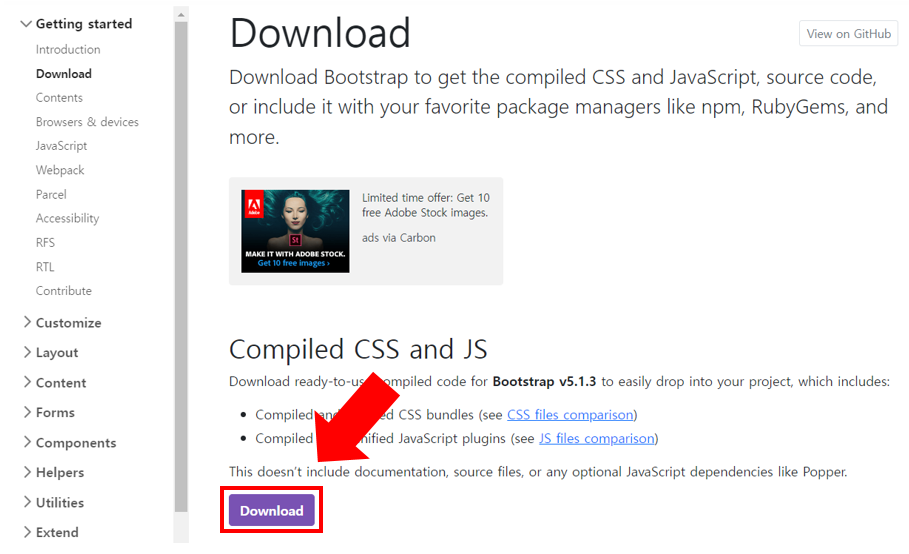
Download
Download Bootstrap to get the compiled CSS and JavaScript, source code, or include it with your favorite package managers like npm, RubyGems, and more.
getbootstrap.com
아래 "Download" 버튼을 클릭하여 Bootstrap v5.1.3 버전의 파일을 다운로드 합니다.
다운로드 받은 bootstrap-5.1.3-dist.zip 압축 파일을 해제하고 css 폴더 앙ㄴ에 있는 bootstrap.min.css 파일을 복사하여 스태틱 디렉터리에 저장합니다.

사용할 준비가 완료 되었으니 적용을 위해 아래와 같이 템플릿 파일에 추가 작성합니다.
부트스트랩 적용
http://localhost:8000/pybo 화면인 question_list.html 템플릿 파일에 아래와 같이 부트스트랩 스타일을 적용합니다.
{% load static %}
<link rel="stylesheet" type="text/css" href="{% static 'bootstrap.min.css' %}">
적용 후 부트스트랩 사용을 위해 아래와 같이 코드를 수정합니다.
{% load static %}
<link rel="stylesheet" type="text/css" href="{% static 'bootstrap.min.css' %}">

<div class="container my-3">
    <table class="table">
        <thead>
        <tr class="table-dark">
            <th>번호</th>
            <th>제목</th>
            <th>작성일시</th>
        </tr>
        </thead>
        <tbody>
        {% if question_list %}
        {% for question in question_list %}
        <tr>
            <td>{{ forloop.counter }}</td>
            <td>
                <a href="{% url 'pybo:detail' question.id %}"> {{question.subject }}</a>
            </td>
            <td>{{ question.create_date }}</td>
        </tr>
        {% endfor %}
        {% else %}
        <tr>
            <td colspan="3">질문이 없습니다.</td>
        </tr>
        {% endif %}
        </tbody>
    </table>
</div>
위와 같이 작성한 후 http://localhost:8000/pybo 페이지를 확인하면 아래와 같이 변경된 것을 확인할 수 있습니다.

코드를 보면 class="container my-3", class="table", class="table-dark" 등은 부트스트랩 스타일에 사전 정의되어 있는 클래스를 그대로 사용한 것이다.
위와 똑같이 질문 상세 페이지에도 부트스트랩을 적용합니다.
question_detail.html 수정
{% load static %}
<link rel="stylesheet" type="text/css" href="{% static 'bootstrap.min.css' %}">
<div class="container my-3">
    <!-- 질문 -->
    <h2 class="border-bottom py-2">{{ question.subject }}</h2>
    <div class="card my-3">
        <div class="card-body">
            <div class="card-text" style="white-space: pre-line;">{{ question.content }}</div>
            <div class="d-flex justify-content-end">
                <div class="badge bg-light text-dark p-2">
                    {{ question.create_date }}
                </div>
            </div>
        </div>
    </div>
    <!-- 답변 -->
    <h5 class="border-bottom my-3 py-2">{{question.answer_set.count}}개의 답변이 있습니다.</h5>
    {% for answer in question.answer_set.all %}
    <div class="card my-3">
        <div class="card-body">
            <div class="card-text" style="white-space: pre-line;">{{ answer.content }}</div>
            <div class="d-flex justify-content-end">
                <div class="badge bg-light text-dark p-2">
                    {{ answer.create_date }}
                </div>
            </div>
        </div>
    </div>
    {% endfor %}
    <!-- 답변 등록 -->
    <form action="{% url 'pybo:answer_create' question.id %}" method="post" class="my-3">
        {% csrf_token %}
        <div class="mb-3">
            <label for="content" class="form-label">답변내용</label>
            <textarea name="content" id="content" class="form-control" rows="10"></textarea>
        </div>
        <input type="submit" value="답변등록" class="btn btn-primary">
    </form>
</div>
위와 같이 작성 후 저장한 다음 http://localhost:8000/pybo/2/ 페이지를 새로고침하면 아래와 같이 확인하실 수 있습니다.

부트스트랩 사용에 대한 자세한 설명은 추후에 부트스트랩 편을 따로 작성하여 설명하겠습니다.
이 글은 점프 투 장고 책을 통해 공부한 내용을 정리한 글입니다.
감사합니다.
'IT > Python' 카테고리의 다른 글
| [Python] django 폼 사용 방법 - 게시판 질문 등록 (0) | 2022.09.28 |
|---|---|
| [Python] django 템플릿 상속 페이지 작성 (0) | 2022.09.19 |
| [Python] django CSS 적용 방법 스태틱(static) (0) | 2022.09.19 |
| [Python] django 데이터 저장 (0) | 2022.09.06 |
| [Python] django URL 별칭 만들기 (0) | 2022.09.02 |


댓글